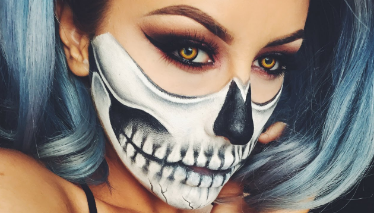
Halloween Half Skull Makeup

Some people don’t like to dress up for Halloween. Some people like to do something just a little bit spooky. This is the perfect tutorial for anyone who wants to rock Halloween without going all out.
First take a white cream eyeshadow and outline the sockets of your eyes using a makeup brush. Then fill in the rest of the face. This is below your eyes and to your chin, including your lips. Next make two little points at the top of the ridge of your nose. Then take a black cream eyeshadow and outline the shape of your nose and fill it in. Go in again with black cream eyeshadow and outline the socket areas of the eyes. Take the black and also put it on the inside of your lips. Very carefully take the black and outline on the cheeks where your teeth sit, also outline where your actual cheekbone is.
Use cream eyeshadow and a flat brush start to fill in that area, lightly dragging it out. Next switch to a small flat brush and draw a line right over the middle of your lips. You are starting the teeth now. Drag thinly where your teeth actually are, try and keep them all the same size. Go back in and start to curve the lines to take the shape of an actual tooth. Then take a matte black eyeshadow and start to shade the area down on your cheekbone on the teeth. Take a small brush and start to shade the definition between the teeth. The shading of the teeth is where the look comes together. Tip: works best if you use a small amount of product at one time and afterward you can go in a add more. Shade cheekbones and under eyes with small flat brushes.
You only need a tiny amount of product on the brushes, this is to just add definition to the look. Take small angled brush and make tiny cracks in the chin area. After cracks, shade the bottom of the chin.

My name is Katie Hyer. I am 17-years-old and a senior at Middletown North. I am a competitive dancer outside of school at Not Your Ordinary Dancers located...
